Create an AI agent
You create an agent once and it runs from then on, so the settings you choose decide both what the agent is good at and what it costs. This page covers the settings that define the agent itself. Its capabilities, its memory, and its subscriptions each have their own page, and the wizard links to the same settings.
Requirements
Before you create an agent, you need:
- An LLM integration for the model the agent reasons with. See Configure LLM provider connections with a Grepr integration.
- A Grepr service account for the agent to act as. See Manage Grepr service accounts.
Create an agent
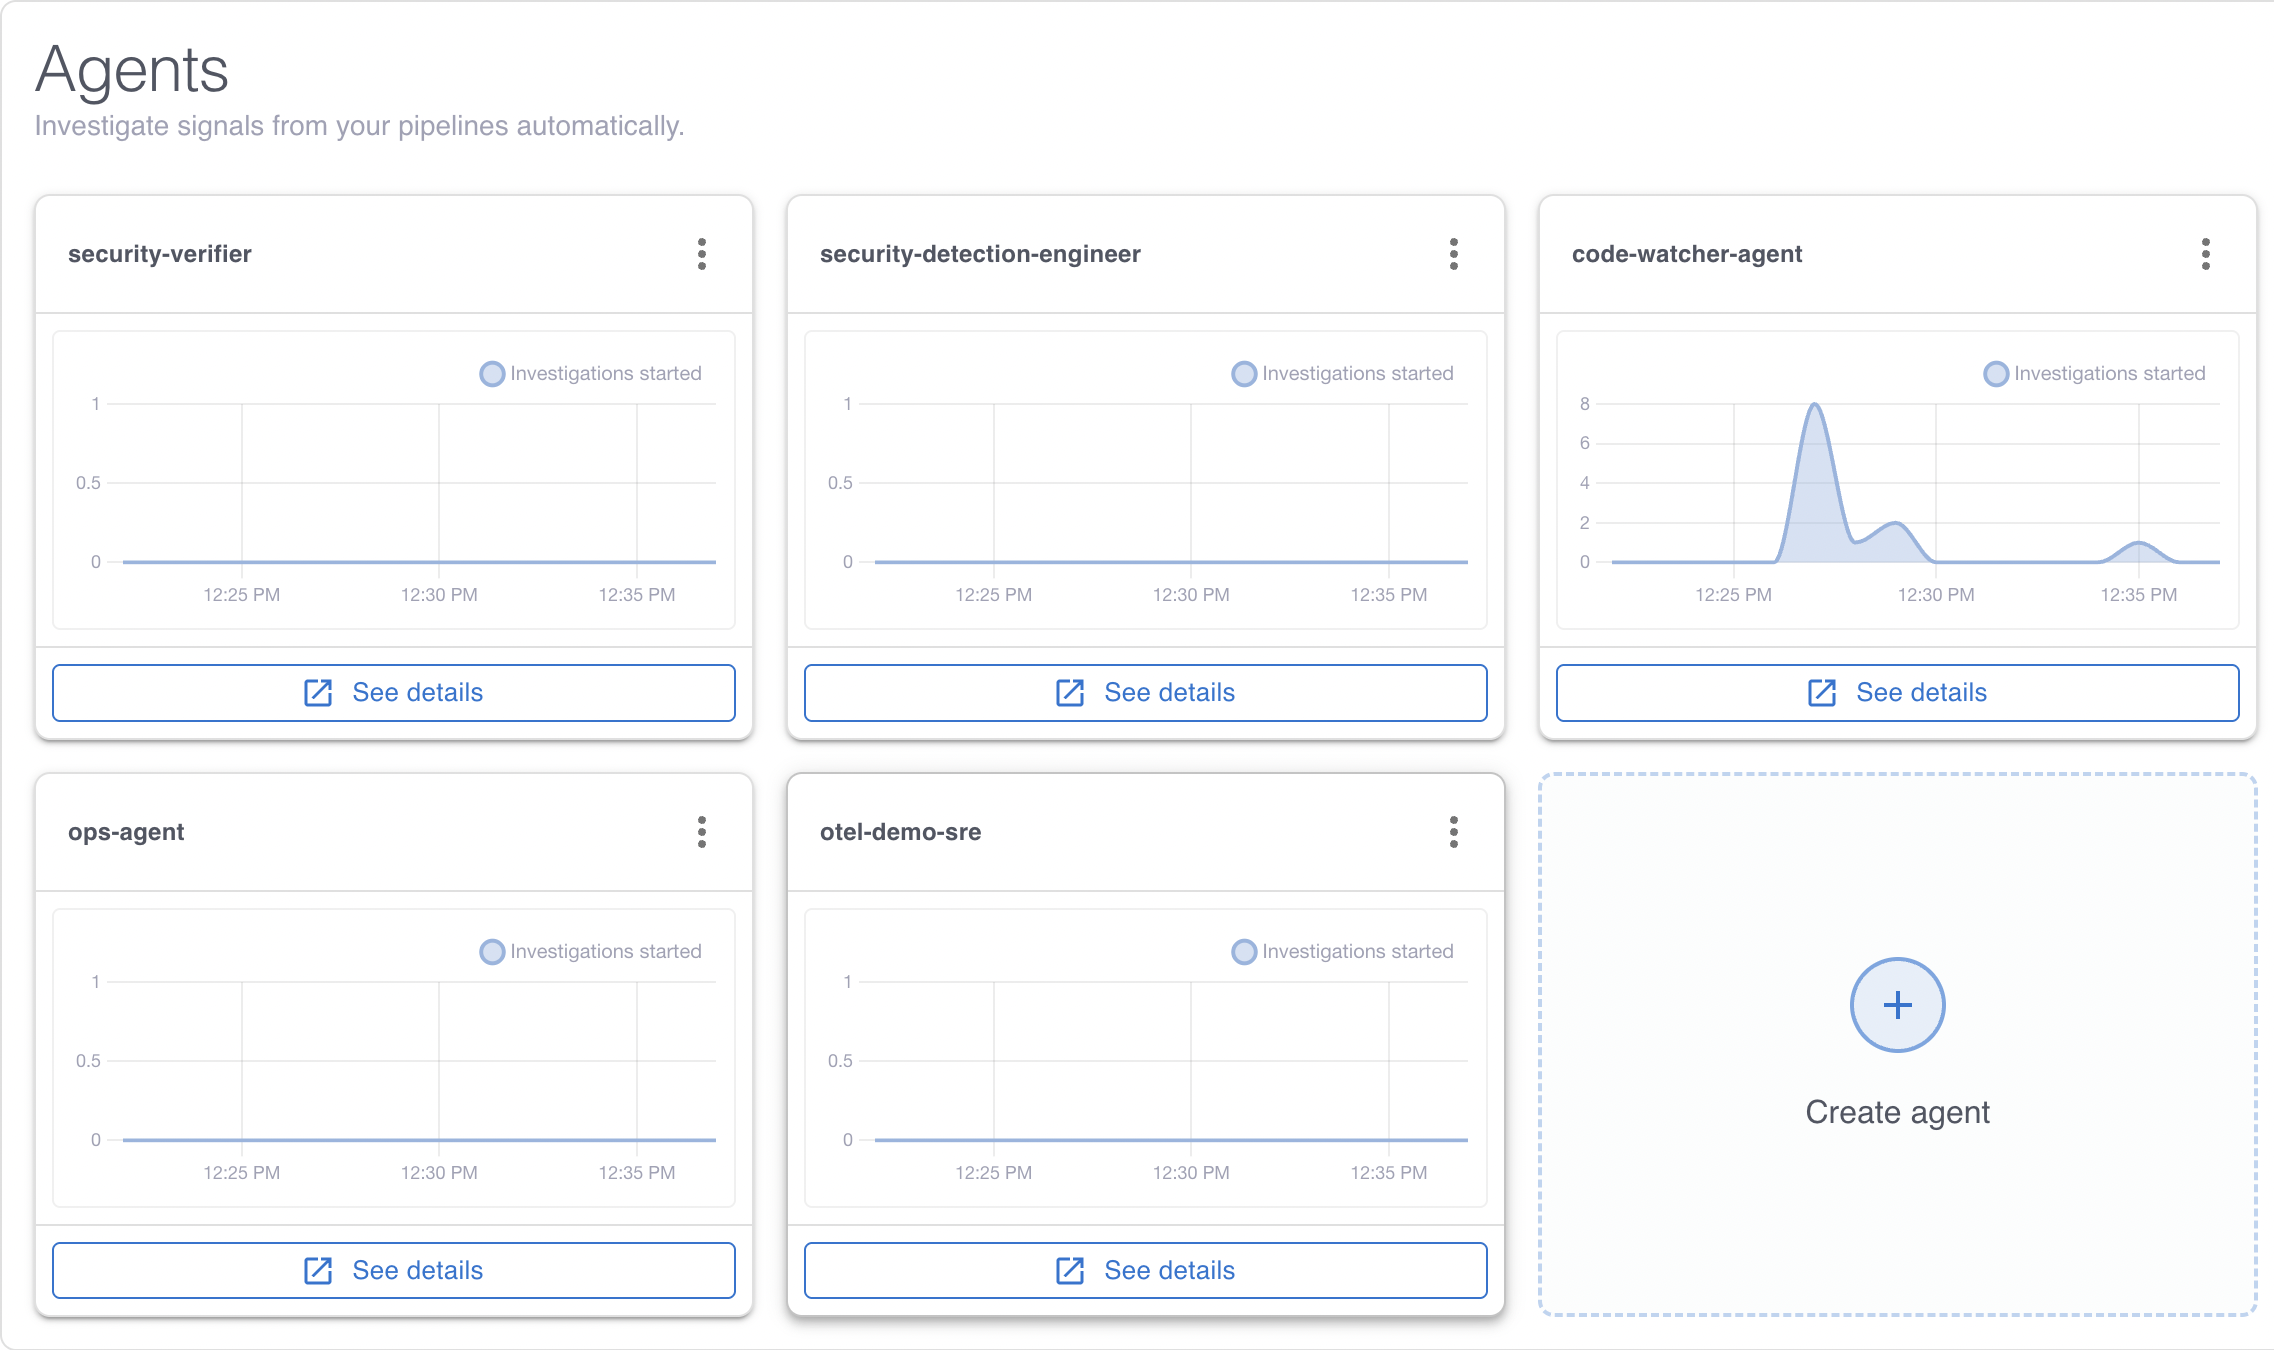
On the Agents page, click Create agent. The Create agent wizard collects the agent’s settings in six steps, and you can move between steps with Back and Continue or by clicking a step in the stepper. The agent is created when you click Create agent on the last step, so you can revise any step before then.
Step 1: Name the agent and write its instructions
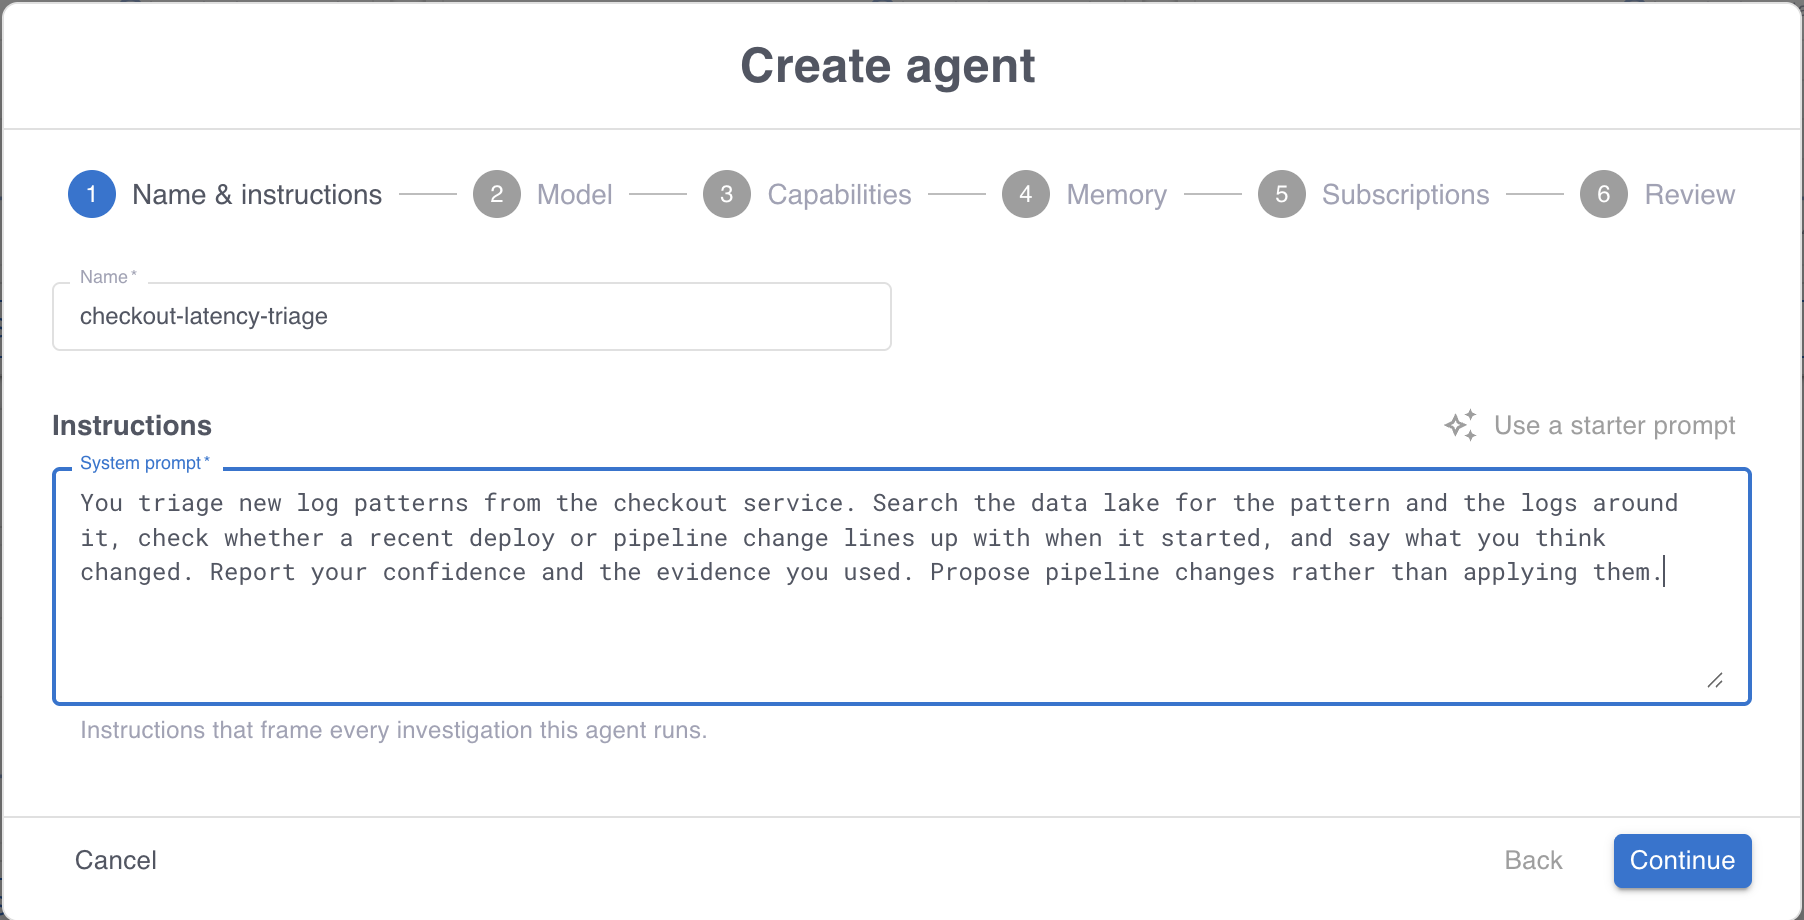
Enter a Name that says what the agent is for, such as prod-log-triage. The name identifies the agent everywhere you subscribe it to a source or read its investigations, and you can change it later.
In the System prompt field, write the instructions that frame every investigation this agent runs. To start from a working example rather than an empty field, click Use a starter prompt and edit what it gives you.
Step 2: Choose a model
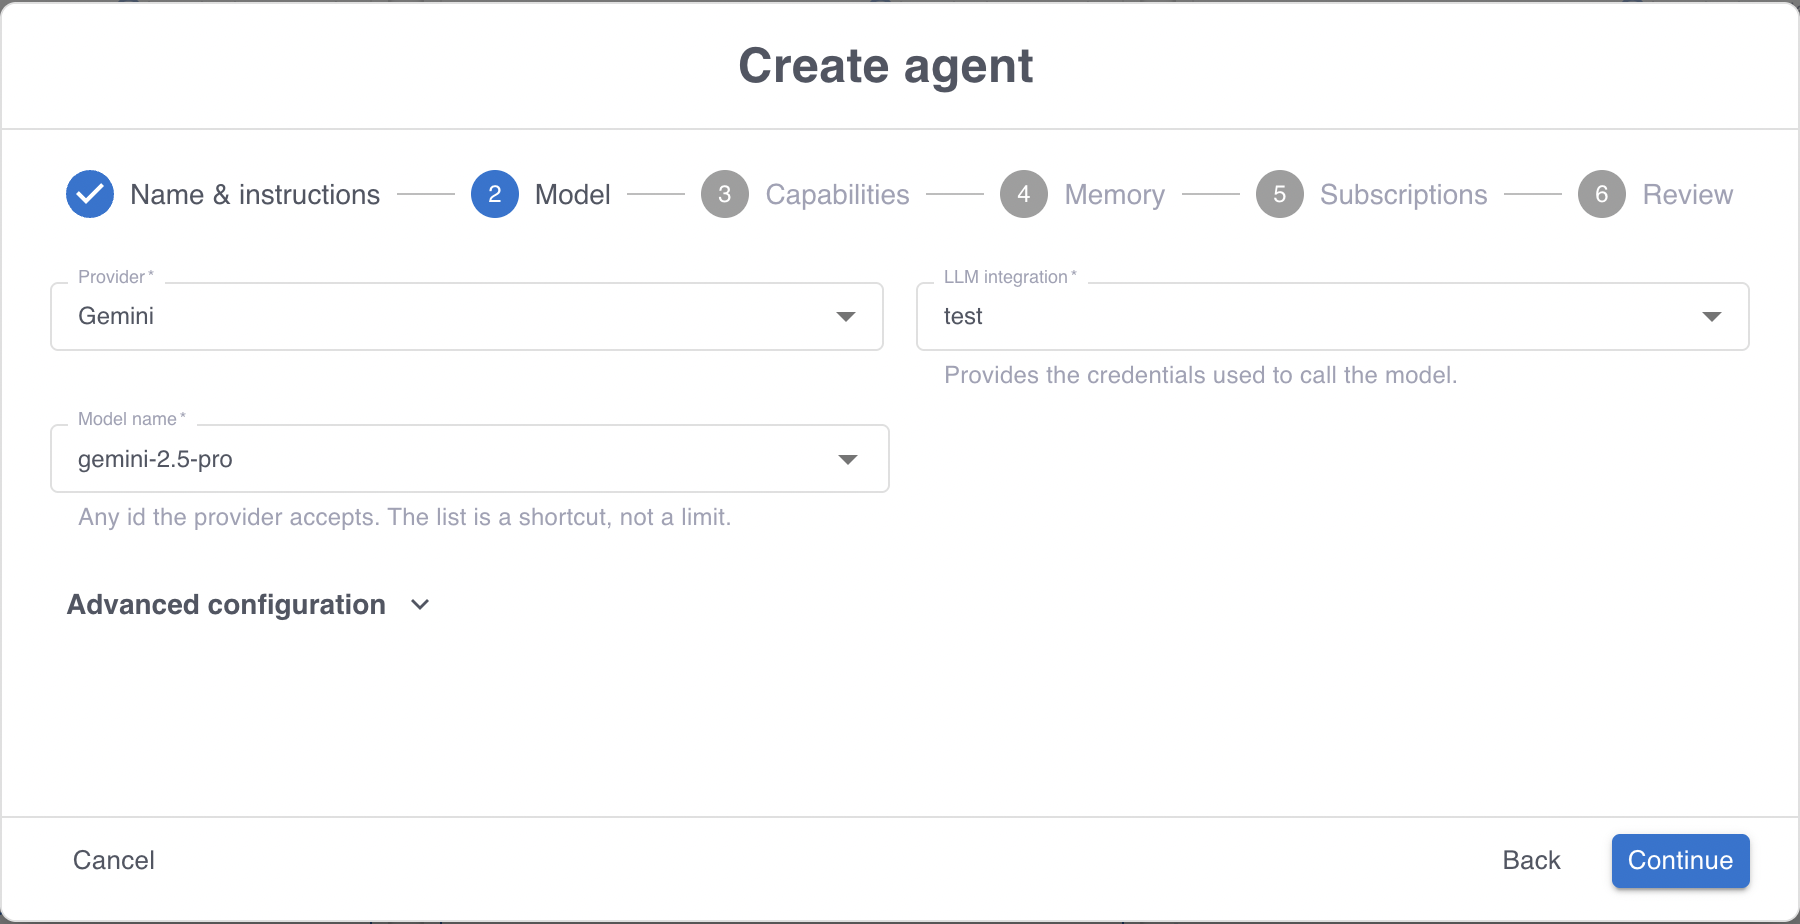
- In the Provider menu, select the provider of the LLM integration you want the agent to use.
- In the LLM integration menu, select the integration that provides the credentials for that provider. If the menu is empty, create the integration first. See Configure LLM provider connections with a Grepr integration.
- In the Model name field, enter the model the agent reasons with. Grepr suggests the models your integration reports, but the field accepts any model identifier the provider serves, so a model missing from the list is still valid.
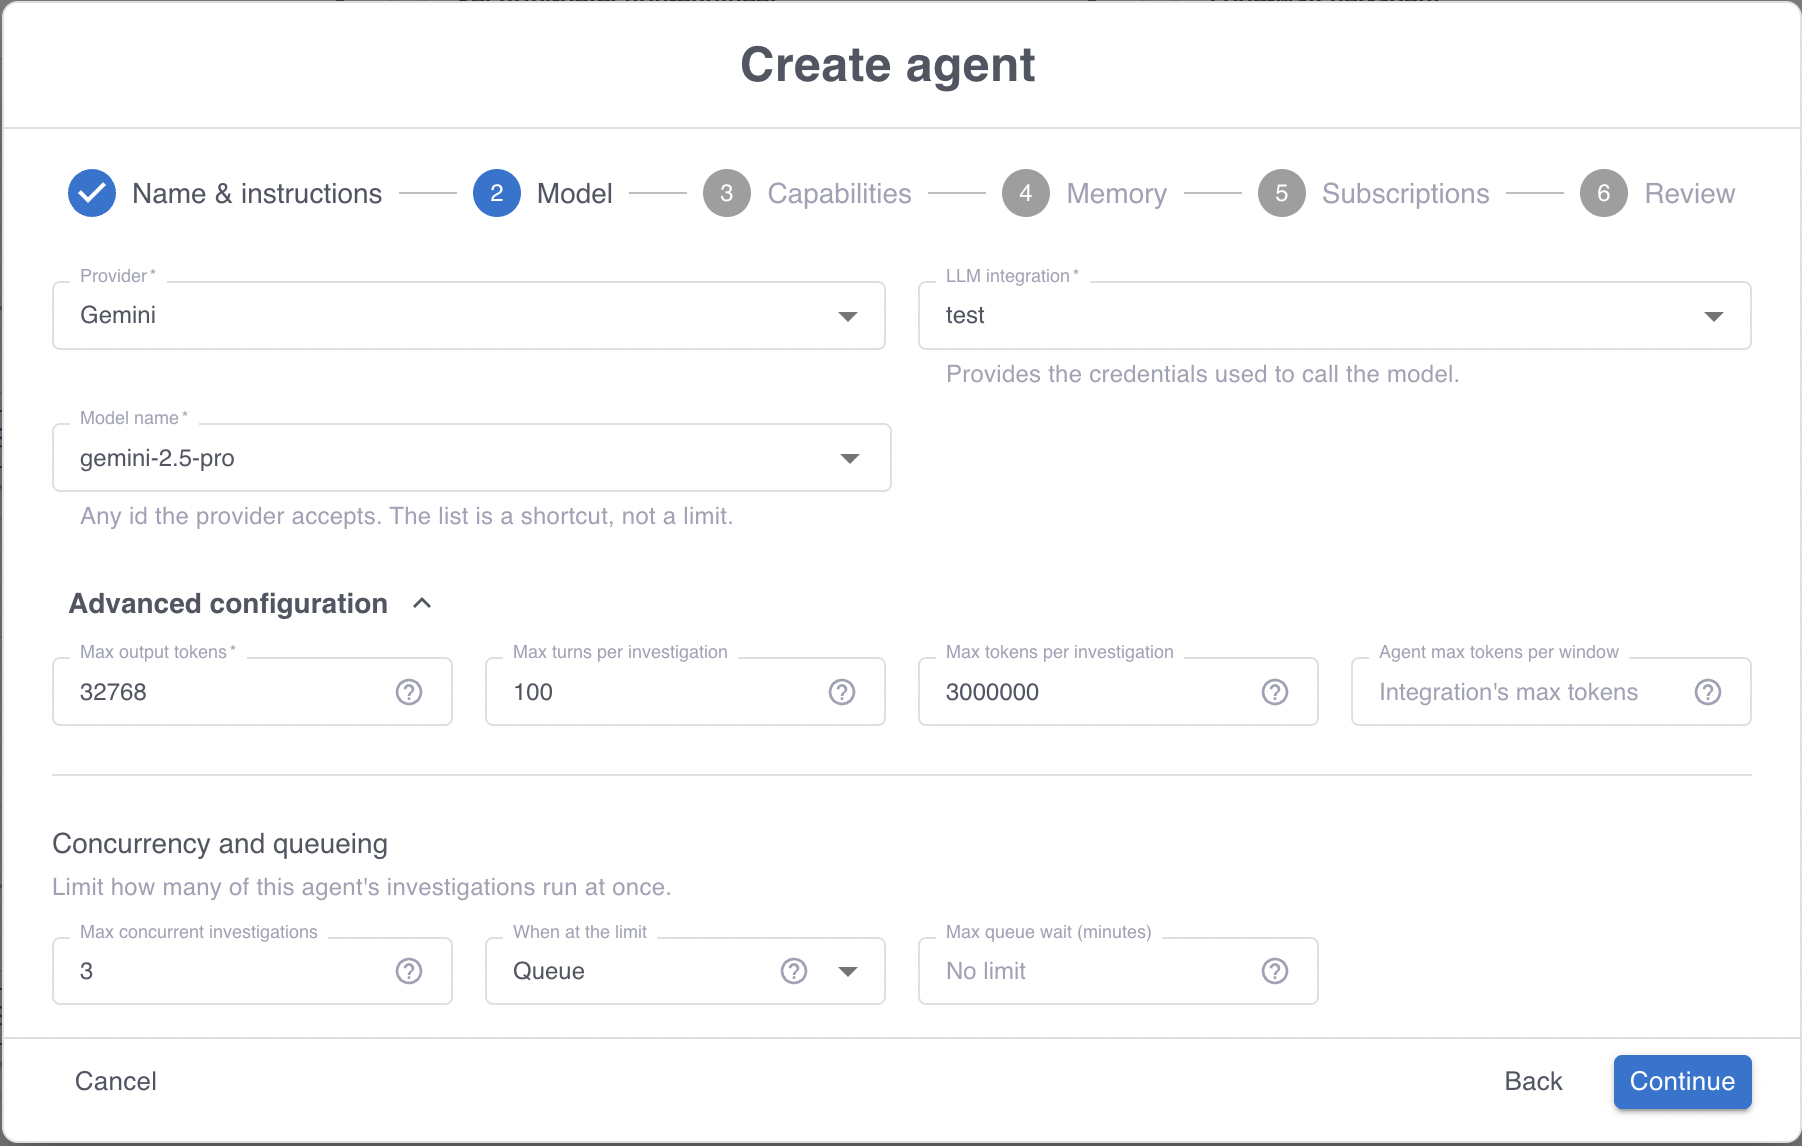
- Set the agent’s limits under Advanced configuration. See Set an agent’s limits.
Investigations are long-running and tool-heavy, so the model you choose changes how well the agent reasons across many turns, not just how fast it answers. Prefer a model that handles extended tool use.
Step 3: Grant capabilities
The Capabilities step is where you choose the service account the agent acts as, the tools and skills it can use, the MCP servers it can call, and whether the pipeline changes it proposes need your approval. To learn more, see Control what an AI agent can do.
Step 4: Configure memory
The Memory step is where you decide whether the agent keeps and searches conclusions from its past investigations. To learn more, see Remember past investigations.
Step 5: Subscribe to signal sources
The Subscriptions step is where you connect the agent to the pipelines and Grepr Agent integrations whose signals it investigates. You can leave it empty and subscribe later from the agent’s page. To learn more, see Subscribe an agent to signal sources.
Step 6: Review and create
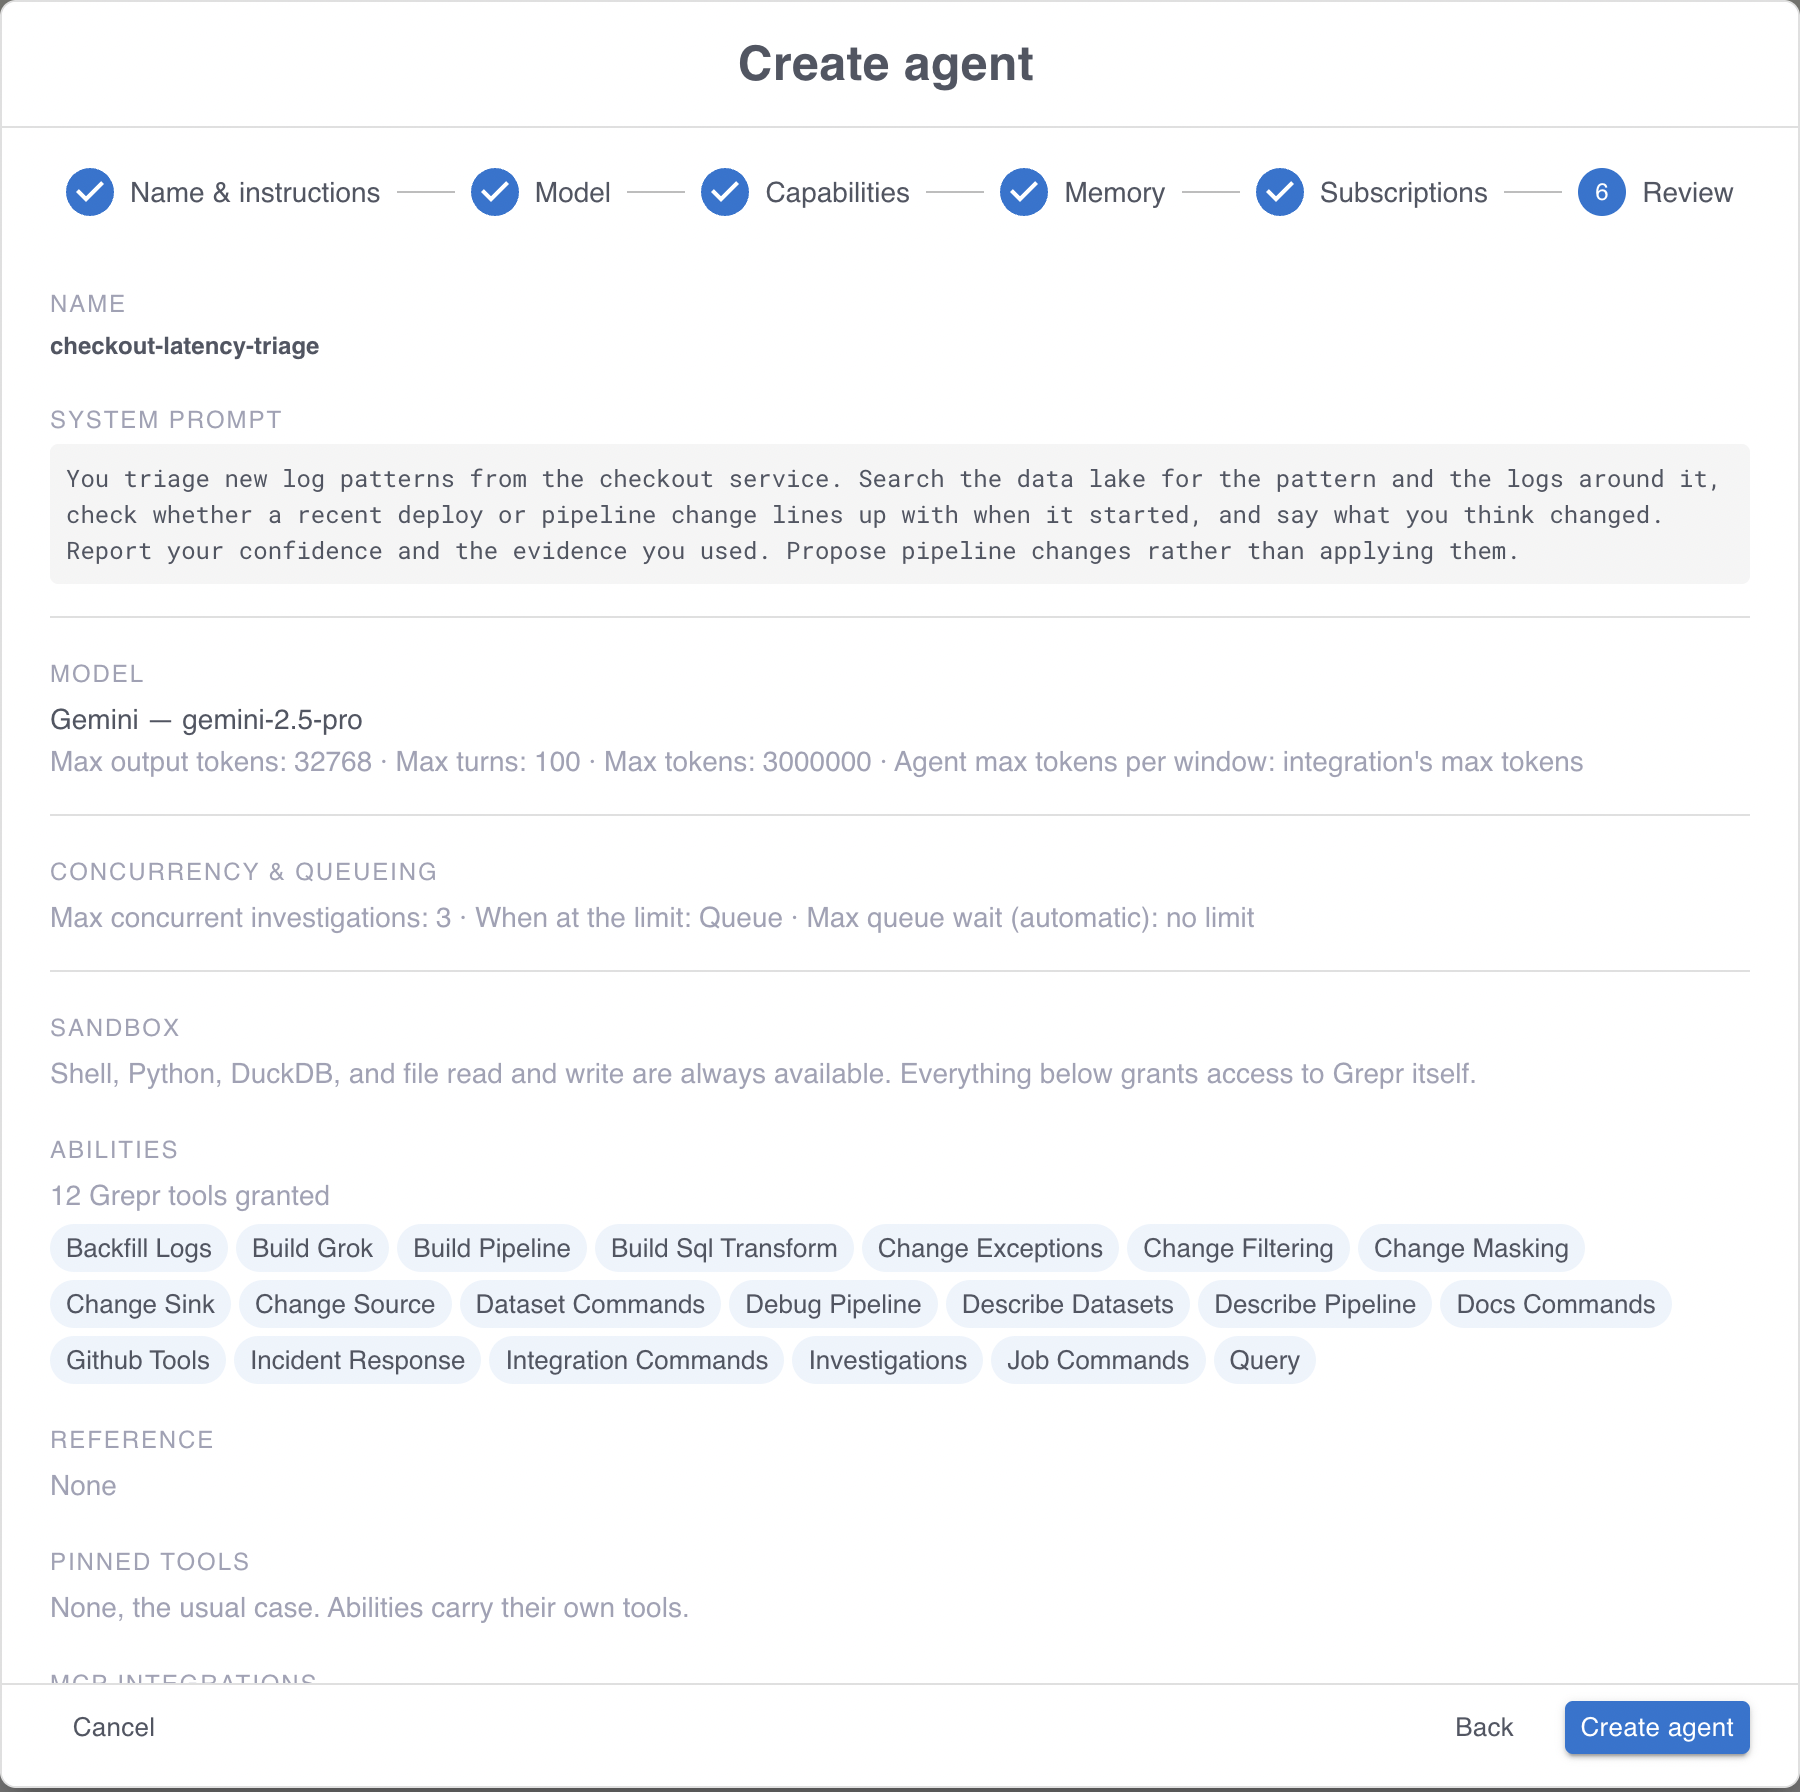
The Review step lists every setting you chose. Check the system prompt, the model, the abilities and tools, and the subscriptions, then click Create agent.
An agent with subscriptions starts investigating as soon as its sources produce signals. To review its behavior before it runs on live signals, create it without subscriptions, start an investigation manually, read the transcript, then subscribe it. See Start an investigation manually.
Set an agent’s limits
An agent’s limits are under Advanced configuration on the Model step, and on the Behavior step after the agent exists. They are what bound the work and the cost of a single investigation and of the agent as a whole.
Limit a single investigation
| Setting | What it does |
|---|---|
| Max output tokens | The largest response Grepr accepts from the model in one call. |
| Max turns per investigation | How many turns an investigation can take before it ends. A turn is one model call and the tool calls that follow it. |
| Max tokens per investigation | The total tokens one investigation can consume. The default is 3,000,000. |
An investigation that reaches its turn or token limit ends where it is, keeping the transcript and the summary it had reached.
Limit the agent as a whole
Agent max tokens per window caps the tokens this agent can consume across all its investigations in each budget window. Leave it empty to bound the agent only by the budget on its LLM integration.
Grepr reserves an investigation’s tokens before it starts and requires room in two budgets: this agent’s window budget, and the budget on the LLM integration the agent shares with any other agent using it. When either is exhausted, new investigations stop starting, and the agent’s page reports which budget blocked them and when the window resets. Raising this agent’s limit does not help when the shared integration is the one that is full. To set the integration’s budget, see Cap token consumption with a budget window.
The two kinds of invocations, manual and signal triggered, end differently when a budget is exhausted. An investigation you start manually is discarded immediately, so you learn straight away. One triggered by a signal stays queued and runs when capacity returns, unless it waits longer than the maximum queue wait.
Control concurrency and queueing
| Setting | What it does |
|---|---|
| Max concurrent investigations | How many of this agent’s investigations run at the same time. The default is 3. |
| When at the limit | Whether an additional signal waits or is dropped. Queue holds it until a slot frees. Discard drops it. |
| Max queue wait (minutes) | How long a queued investigation waits before Grepr discards it. Leave empty for no limit. |
The maximum queue wait applies only to investigations triggered by a signal, not to the ones you start manually. Set it when a stale signal is not worth investigating, such as a pattern that stopped occurring an hour ago. Leave it empty when you want every signal investigated eventually.
An agent subscribed to a busy pipeline can produce more signals than it can investigate. Discard keeps the agent current at the cost of skipping signals, and Queue with a maximum wait keeps a bounded backlog. To reduce the signals instead of dropping them, narrow what the source emits. See Subscribe an agent to signal sources.
Write a system prompt
The system prompt is read at the start of every investigation this agent runs, so it should describe the agent’s standing job rather than any one incident. A prompt that works well:
- States what the agent is responsible for and what it should leave alone.
- Names the systems and services it covers, using the same names that appear in your logs, so the agent can match a signal to a service.
- Says what a finished investigation looks like, such as whether the agent should attempt a remediation or only diagnose.
- Says when the agent should change a pipeline and when it should not.
Keep behavior that only applies sometimes out of the prompt and put it in a skill, which the agent loads when it is relevant. This keeps the prompt short and lets several agents share the same guidance. See Extend agents with skills.
You can revise the prompt at any time on the agent’s Behavior step. A revised prompt applies to investigations that start afterwards, and running investigations keep the prompt they started with.
Monitor an agent
The agent’s Overview step reports how the agent is doing over the time range you select, with its model, its last investigation, the share of its runs that failed, its run times, and how much of its token budget it has used. Three charts break down the investigations it started, how they ended, and the tokens they consumed.
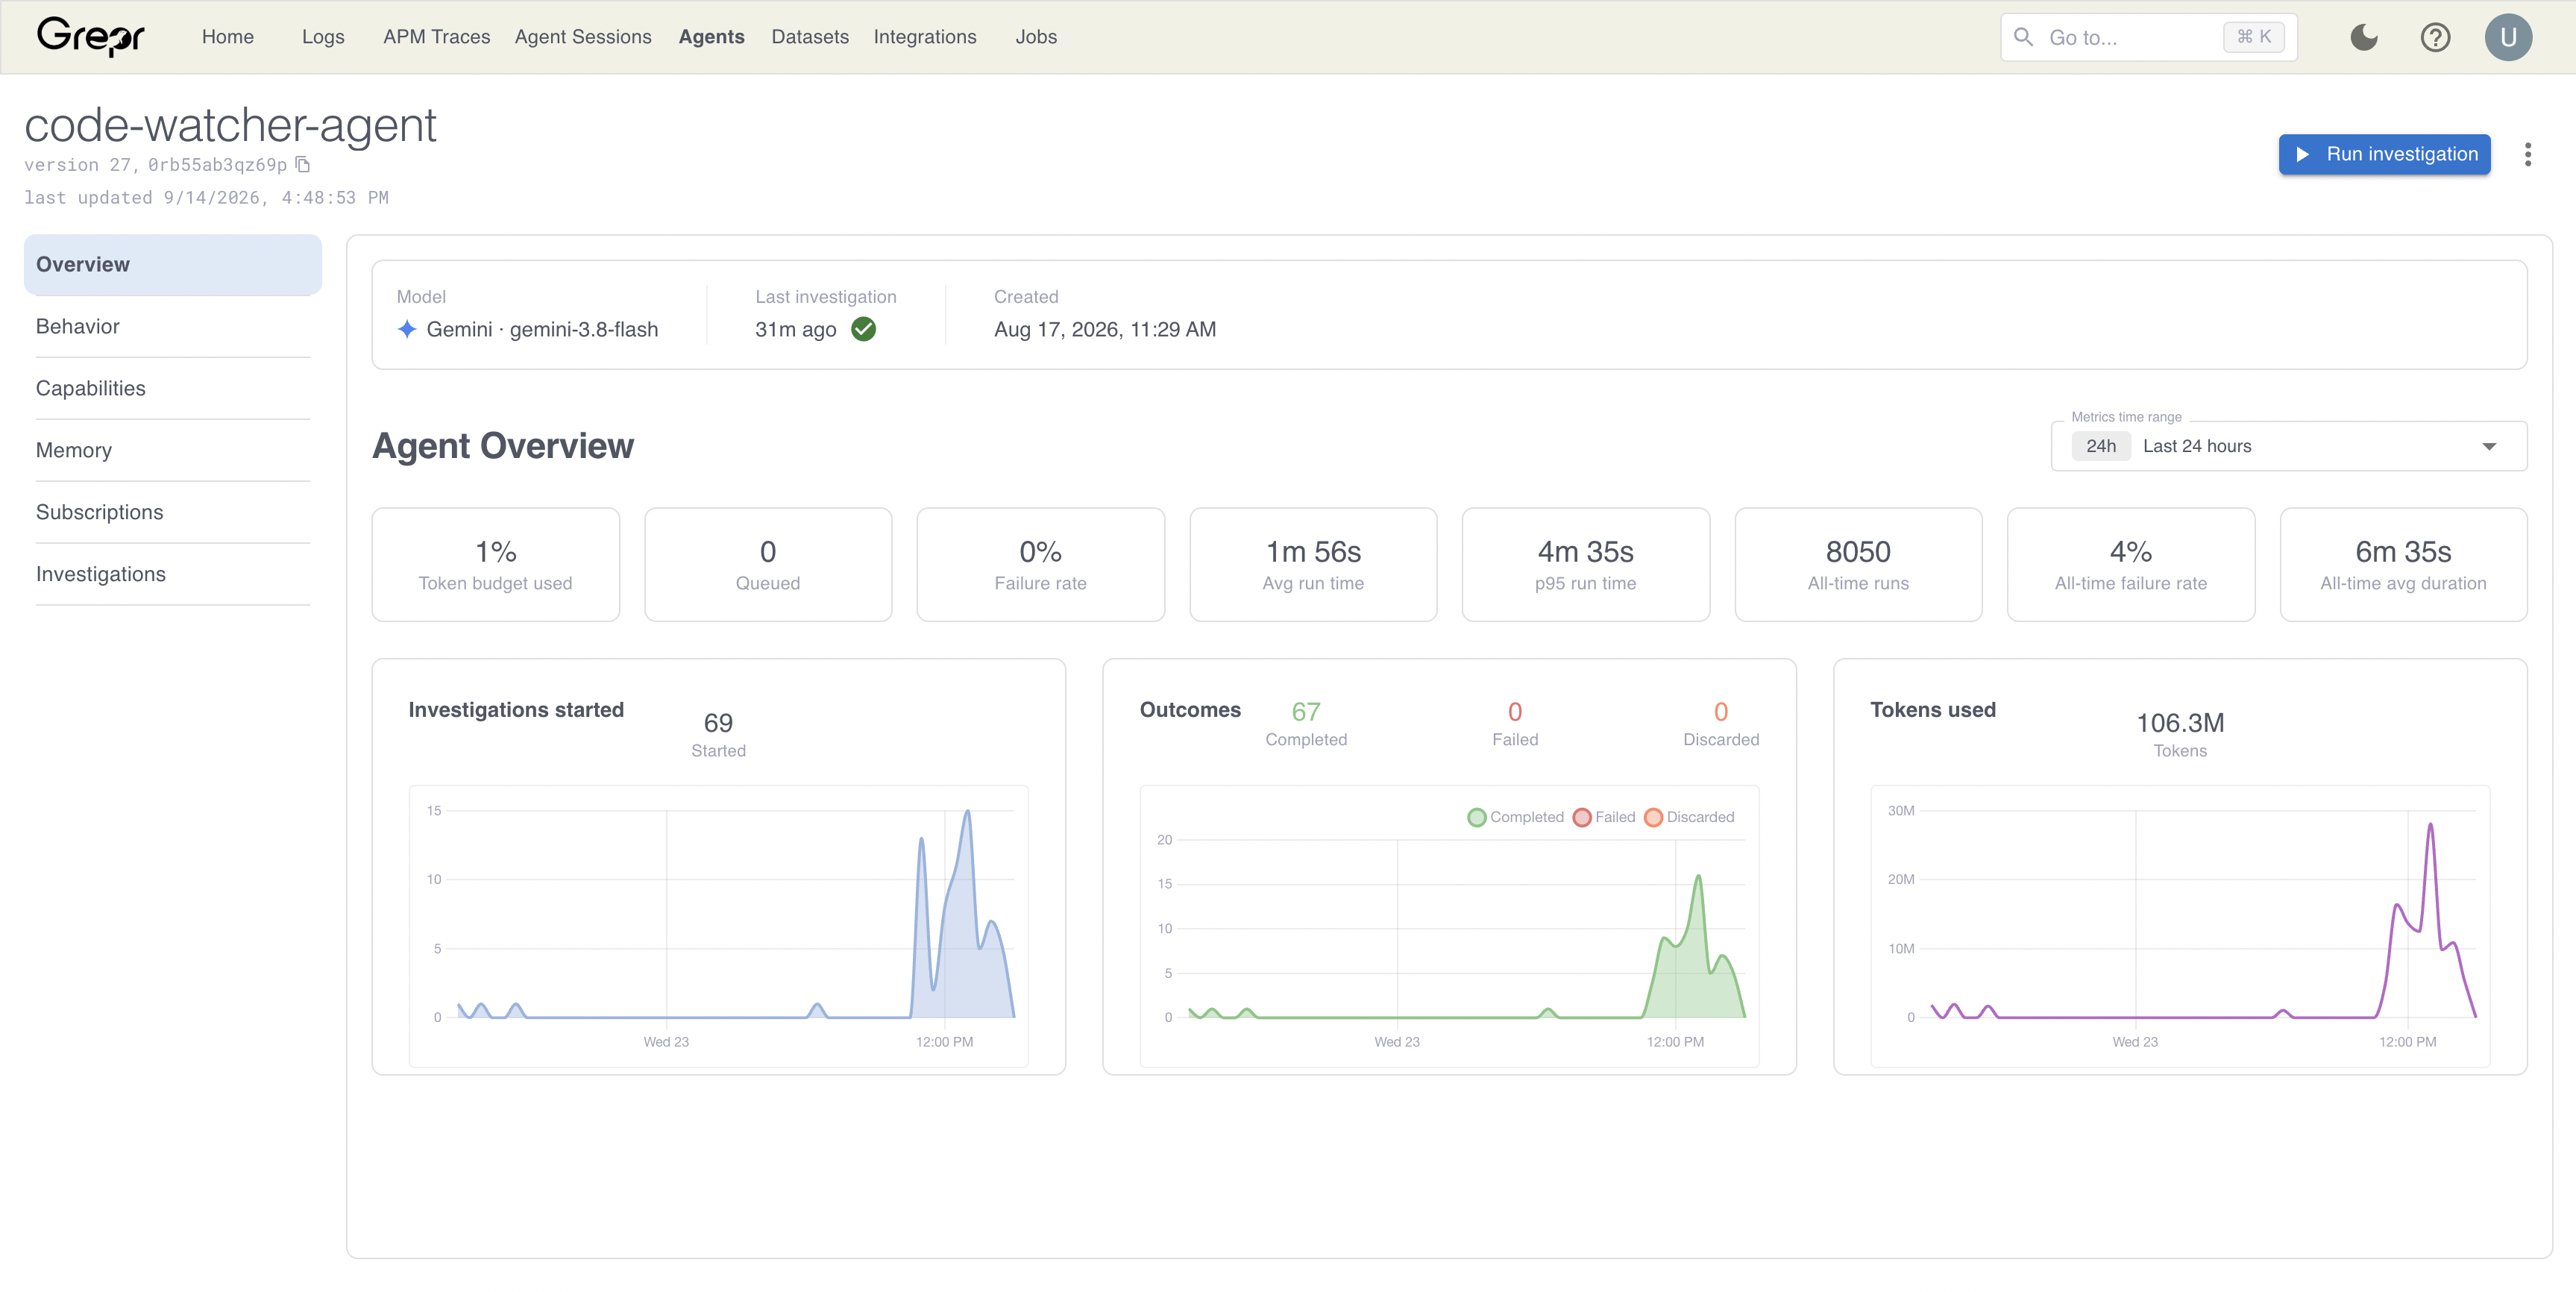
Read the failure rate together with the outcomes chart. Failures concentrated in time usually point at the model or a tool that became unavailable, while a failure rate that is steady across the range usually points at the agent’s instructions or its limits.
When a token budget is exhausted, new investigations stop starting and resume when the window resets. The agent’s page shows which of the two budgets blocked them.
Edit an agent
An agent’s settings are spread across the steps on its page, which hold the same fields as the wizard:
- Behavior holds the name, the system prompt, the model, and the limits.
- Capabilities holds the service account, the tools, the skills, the MCP integrations, and the change approval mode.
- Memory holds the memory settings.
Changes on these three steps are held until you click Save Changes, so you can revise several steps in one pass. To abandon them, click Discard Changes. Subscriptions are not part of this and apply as soon as you make them.
An investigation reads the agent’s instructions, model, and limits when it starts, so correcting those mid-incident leaves the current run on the settings it began with and applies to the next one.
The change approval mode is the exception. Grepr checks it when the agent submits a pipeline change, not when the investigation started, so switching an agent to Auto-apply lets an investigation that is already running apply its own changes.
Delete an agent
To delete an agent, on its page, open the three-dot menu and select Delete agent. You can also delete it from the three-dot menu on its card on the Agents page.
Grepr refuses to delete an agent while a pipeline is subscribed to it or a Grepr Agent integration names it, so detach it from both on its Subscriptions step first. A pipeline that names the agent directly in its agent signal sink is not covered by that check, so open the sink in each such pipeline and clear the agent from the Agents field yourself. A sink keeps at least one agent, so where the agent you are deleting is the only one named, either select another agent in its place or remove the sink along with the routes that feed it. A signal that arrives for a deleted agent is discarded. Investigations already running finish, and no new ones start.
Deleting an agent does not delete its investigations or the memories it recorded, which stay readable and searchable by your other agents.